
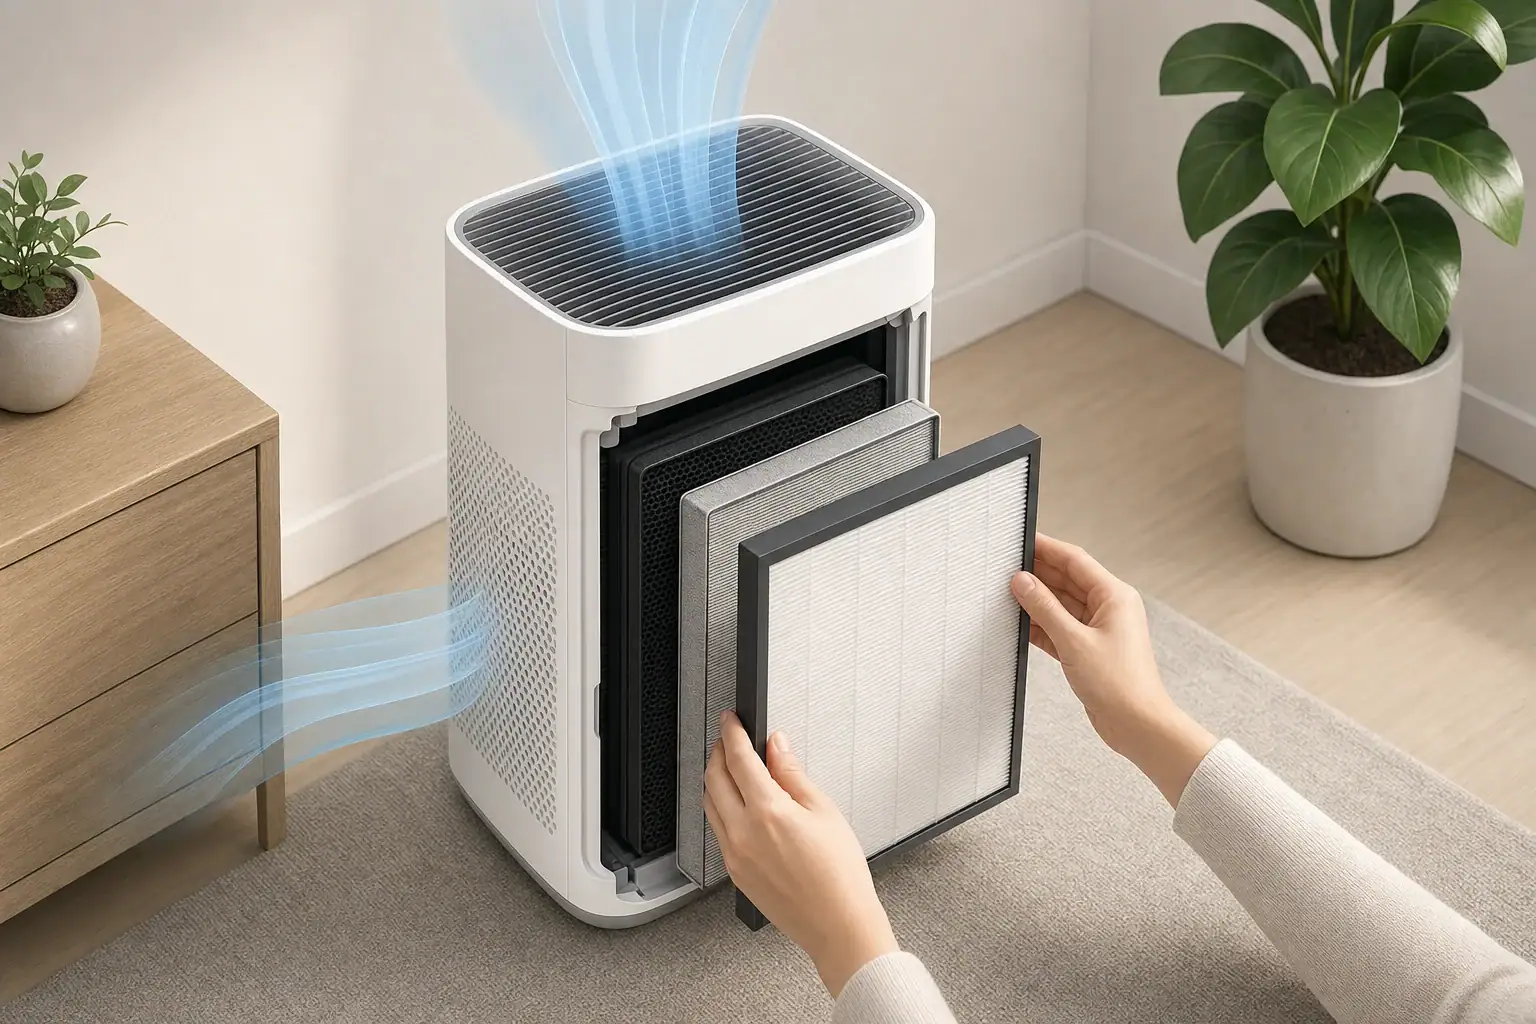
An air purifier that starts rattling after a filter change usually has a filter, cover, or removable insert that is not fully seated.
The sound may also come from packaging left on the filter, a loose prefilter, or the purifier vibrating against a nearby surface. Most causes can be checked without opening sealed components or modifying the appliance.
Quick answer
- Turn the purifier off and unplug it before removing covers or filters.
- Remove all bags, bands, cardboard, foam, and shipping inserts from the replacement filter.
- Confirm that the filter matches the required dimensions and sits flat with no gap, tilt, or forced fit.
- Leave roughly 6–12 inches of clearance from walls or furniture when the manual does not specify another distance.
- Test the purifier for 30–60 seconds on low, medium, and high to identify whether the noise changes with fan speed.
Why an Air Purifier May Rattle After a Filter Change
A filter change alters the parts immediately around the purifier’s airflow path. If the rattling begins as soon as the new filter is installed, the installation is therefore the most useful place to start.
Many purifiers hold the filter between a fixed housing and a removable panel. Tabs, rails, clips, foam seals, prefilters, or tension from the cover may keep the assembly stable. A filter that is slightly tilted can move as the fan draws air through it.
The replacement filter may also differ subtly from the old one. Even when two filters look similar, differences in frame depth, gasket position, pull-tab placement, or rigidity can affect fit. The replacement should be specifically compatible with the purifier’s model requirements; a filter should not need to be bent, compressed, trimmed, or forced into place.
Not every post-change noise comes from the filter. Moving the purifier during maintenance may leave it on an uneven floor, push it against a wall, or cause its power cord to touch the cabinet. These contact points can turn ordinary fan vibration into an audible buzz or rattle.
How to Identify the Source of the Rattling
First, listen for when the sound occurs. A loose cover may rattle at one fan speed but remain quiet at another. A misplaced filter tab may produce a light flutter, while contact with furniture can create a lower buzzing sound.
Check whether fan speed changes the noise
With the purifier fully assembled, run it briefly on each normal setting. If the sound becomes faster or stronger as airflow rises, check the filter, prefilter, grille, and cover. If the sound stays constant, inspect the floor, cord, and nearby objects.
Locate the general area without opening the unit
Stand beside the purifier and listen near each removable exterior panel. Do not insert fingers or tools through a grille. Lightly placing a hand on the outside of a closed panel may help identify vibration, but do not block an intake or outlet during operation.
A brief recording can also help compare sound before and after reseating the filter. Stop testing if the purifier smells hot, shows visible damage, repeatedly loses power, or makes a grinding sound rather than a light rattle.
Example values for illustration.
| Observed cue | Likely area to check | Simple response |
|---|---|---|
| Noise began immediately after replacement | Filter orientation or seating | Remove and reinstall the filter |
| Light fluttering sound | Pull tab, prefilter, or loose wrapping | Secure the intended layer and remove packaging |
| Panel buzzes at higher speed | Cover tabs or latches | Reseat the cover evenly |
| Low vibration near a wall | Insufficient clearance | Move the unit about 6–12 inches away |
| Sound changes when the unit is moved | Floor or furniture contact | Use a level, stable surface |
| Noise remains with the filter reseated | Wrong filter dimensions or internal issue | Verify compatibility and stop if grinding persists |
Common Filter Installation Mistakes
Packaging remains on the filter
Replacement filters are often sealed to stay clean during storage. A clear plastic bag can be easy to overlook, especially around a dark filter frame. Bands, cardboard edge guards, foam pieces, and other shipping materials must also be removed unless the instructions explicitly identify a piece as part of the filter.
Running a purifier with packaging in place can restrict airflow and make the material vibrate. It may also place unnecessary load on the fan.
The filter faces the wrong direction
Some filters have a required airflow direction or a side that must face the intake. Others are symmetrical. Follow the orientation shown in the appliance instructions or on the original filter arrangement rather than assuming that all filters install in the same direction.
A pull tab or edge is trapped
A filter-removal tab should generally remain accessible, but it must not cross a sealing surface, protrude into a fan opening, or become pinched between cover tabs. Position it according to the instructions.
The prefilter is loose
A washable screen, fabric prefilter, or hook-and-loop attachment may not have been returned to its original position. Loose edges can flutter in moving air. If the prefilter was washed, reinstall it only when it is fully dry and the instructions permit washing.
The cover is attached unevenly
A panel can appear closed while one tab remains outside its slot. Avoid striking or forcing it into place. Remove the panel, align all tabs, and apply gentle, even pressure at the designated attachment points.
Step-by-Step Fit Checks and Simple Fixes
- Shut down safely. Turn off the purifier, unplug it, and wait for the fan to stop completely.
- Move to an open work area. Place the unit on a stable surface with enough light to see the filter compartment and attachment points.
- Remove the filter assembly. Follow the normal replacement procedure. Do not remove screws or open sealed motor or electrical compartments.
- Inspect for packaging. Check every face and edge for plastic, cardboard, foam, ties, or adhesive transport pieces that are meant to be discarded.
- Compare the filter with the required type. Confirm its shape, depth, frame design, gasket location, and orientation. A filter that rocks in the compartment or prevents normal panel closure may be incompatible.
- Check removable layers. Make sure the prefilter, carbon sheet, retaining frame, and other user-serviceable pieces are flat and attached as directed.
- Clean accessible contact areas. Use a dry, soft cloth or vacuum attachment if permitted by the manual. Dust along a rail or gasket can prevent a flat fit. Keep moisture away from electrical parts.
- Reinstall without force. Slide or place the filter squarely into its guides. Confirm that seals meet the housing and that tabs remain clear of the airflow path.
- Close the cover evenly. Engage each tab or latch. The panel should sit flush without a visibly raised corner.
- Restore clearance and test. Put the purifier on a level surface, keep the cord from touching the cabinet, and run each fan speed briefly.
If reseating solves the noise, continue normal operation and listen again over the next few cycles. If it returns, recheck the cover and nearby contact points rather than repeatedly forcing the filter deeper.
What Different Rattling Scenarios Can Indicate
The purifier rattles only on high speed
Higher airflow creates more pressure across the filter and increases ordinary cabinet vibration. A slightly loose screen, cover, pull tab, or carbon sheet may therefore become audible only on high. Reseat removable parts and check that the purifier is not touching a wall, curtain, shelf, or power cord.
The replacement filter feels looser than the old one
Verify the required replacement dimensions and model compatibility. Do not add homemade foam, tape, folded paper, or other material to fill a gap. Such additions can interfere with sealing, airflow, sensors, or fire-safety design.
The cover will not close normally
Remove the filter and look for reversed orientation, an obstructed tab, doubled filter layers, or packaging. A cover that requires unusual pressure is a sign to stop and recheck the installation.
The sound continues after the old filter is reinstalled
If the old filter is still clean enough for a brief comparison test, a continuing rattle may point to the purifier’s placement or to an unrelated mechanical issue that appeared while the unit was moved. Do not continue using a damaged, heavily loaded, damp, or contaminated old filter simply for diagnosis.
The noise is grinding, scraping, or knocking
These sounds are less consistent with a lightly vibrating filter. Turn the purifier off and unplug it. Use manufacturer-authorized support or qualified service rather than attempting to reach the fan or motor.
Safety Considerations During Troubleshooting
Limit troubleshooting to user-serviceable filters, prefilters, covers, and accessible surfaces identified in the instructions. Opening the motor housing, defeating a cover switch, or operating the purifier while required guards are removed can expose moving or electrical parts.
Never place tools through intake or outlet grilles. Do not run the purifier without its required filter merely to see whether the sound stops unless the operating instructions explicitly allow that test. The filter may form part of the appliance’s intended airflow resistance and protection from debris.
A rattling noise is not, by itself, evidence of ozone production or an air-quality hazard. Some purifiers include optional ionization, electrostatic, or UV-C features, but those technologies are separate from the mechanical fit of a replacement filter. Follow the appliance instructions for disabling optional features if desired, and never modify electrical or safety systems.
Stop using the purifier if there is smoke, a burning odor, liquid intrusion, a damaged cord, unusual heat, repeated shutdowns, or a persistent scraping or grinding sound. A minor panel vibration can often be corrected through fit checks; electrical or internal mechanical symptoms require a different level of attention.
Filter Maintenance That Helps Prevent Future Rattles
Before removing an old filter, note its orientation and the routing of any pull tabs. A quick photo for personal reference can make reassembly easier, provided no disassembly beyond normal filter access is needed.
Keep the filter compartment and panel attachment points free of loose dust. A soft brush, dry cloth, or gentle vacuuming may be appropriate for accessible surfaces, but follow the maintenance instructions. HEPA-style filters and bonded carbon filters are commonly not washable unless specifically marked otherwise.
Replacement timing depends on filter design, operating hours, fan speed, particle loading, smoke exposure, pets, renovation dust, and other conditions. A calendar interval is a planning aid, not proof that a filter is clean or exhausted. Use the manufacturer’s schedule together with condition checks and any filter indicator.
Store spare filters flat or in the position recommended for storage, in a clean and dry location. A bent frame or compressed gasket may not seal or sit evenly later. Keep packaging on during storage, but remove it completely before installation.
Example values for illustration.
| Filter or part | Planning interval | Factors that may shorten it | Maintenance note |
|---|---|---|---|
| Disposable particle filter | About 6–12 months | Heavy dust, smoke, long run times | Follow the specified replacement schedule |
| Thin carbon sheet | About 3–6 months | Persistent odors, cooking, smoke | Replace rather than wash unless directed |
| Substantial carbon filter | About 6–12 months or longer | High gas or odor exposure | Useful life varies widely by carbon amount and use |
| Washable prefilter | Inspect every 2–4 weeks | Pets, lint, visible dust | Reinstall only when fully dry |
| Nonwashable prefilter | Inspect every 2–4 weeks | Lint and hair accumulation | Vacuum gently only if instructions allow |
| Intake and outlet grilles | Inspect monthly | Dusty rooms and continuous operation | Clean with power disconnected |
Related guides: Air Purifier Maintenance Checklist: Filters, Sensors, and Cleaning • How Often Should You Replace a HEPA Filter? • Air Purifier Placement: Where to Put It for Best Results • Air Purifier Noise: What dB Levels Are Quiet Enough for Sleep?
Summary of the Most Useful Checks
When an air purifier rattles after a filter change, begin with the parts that were handled: the filter, prefilter, pull tab, retaining frame, and exterior cover. Remove all packaging, confirm compatibility and orientation, and make sure each component lies flat without being forced.
Also check the purifier’s surroundings. A stable floor, an untangled cord, and roughly 6–12 inches of clearance when no different distance is specified can prevent normal vibration from being amplified by nearby surfaces.
A light rattle that changes with fan speed often points to a fit or contact issue. Grinding, scraping, overheating, burning odors, damaged wiring, or repeated shutdowns are reasons to unplug the unit and seek appropriate service rather than continue testing.
Frequently asked questions
Why is my air purifier rattling after I installed a new filter?
A rattle that begins after a filter change commonly means the replacement filter, prefilter, pull tab, or cover is not fully seated. Check that all packaging has been removed and that the filter is the correct size and orientation for the unit. Reinstall the filter and cover without forcing either part.
Can plastic packaging left on an air purifier filter cause rattling?
Yes. Plastic wrapping, cardboard protectors, foam pieces, bands, and shipping inserts can restrict airflow or vibrate as air moves through the purifier. Unplug the unit and remove all packaging materials unless the instructions state that a component is intended to remain attached.
Why does my air purifier rattle only on high fan speed after a filter change?
High speed increases airflow and cabinet vibration, which can make a slightly loose filter, prefilter, cover, or pull tab more noticeable. Reseat the accessible parts and make sure the purifier is on a level surface with clearance from walls, furniture, curtains, and the power cord.
Should I use tape or foam to stop a loose replacement filter from rattling?
No. Homemade shims, tape, foam, or folded paper can interfere with the intended seal, airflow, sensors, or safety design. If the replacement filter moves noticeably or prevents the cover from closing normally, verify that it is specifically compatible with the purifier.
When should I stop using a rattling air purifier and seek service?
Turn the purifier off and unplug it if the noise is grinding, scraping, knocking, or accompanied by heat, smoke, a burning odor, damaged wiring, or repeated shutdowns. These symptoms may indicate an internal mechanical or electrical problem rather than a filter-fit issue. Do not open sealed motor or electrical compartments to investigate.
Recommended next:
- Air Purifier Maintenance Checklist: Filters, Sensors, and Cleaning
- When to Replace Carbon Filters (And How to Tell They’re Spent)
- How to Clean and Calibrate an Air Quality Monitor
- Air Purifier Maintenance Checklist: Monthly and Seasonal Tasks
- Filter Replacement Schedules: HEPA, Carbon, and Pre-Filters
- Cleaning Air Purifier Sensors and Intakes: What Not to Do
- Clear sizing logic (room size → CADR/ACH)
- HEPA vs carbon explained for real use-cases
- Humidity + ventilation basics to reduce mold risk