
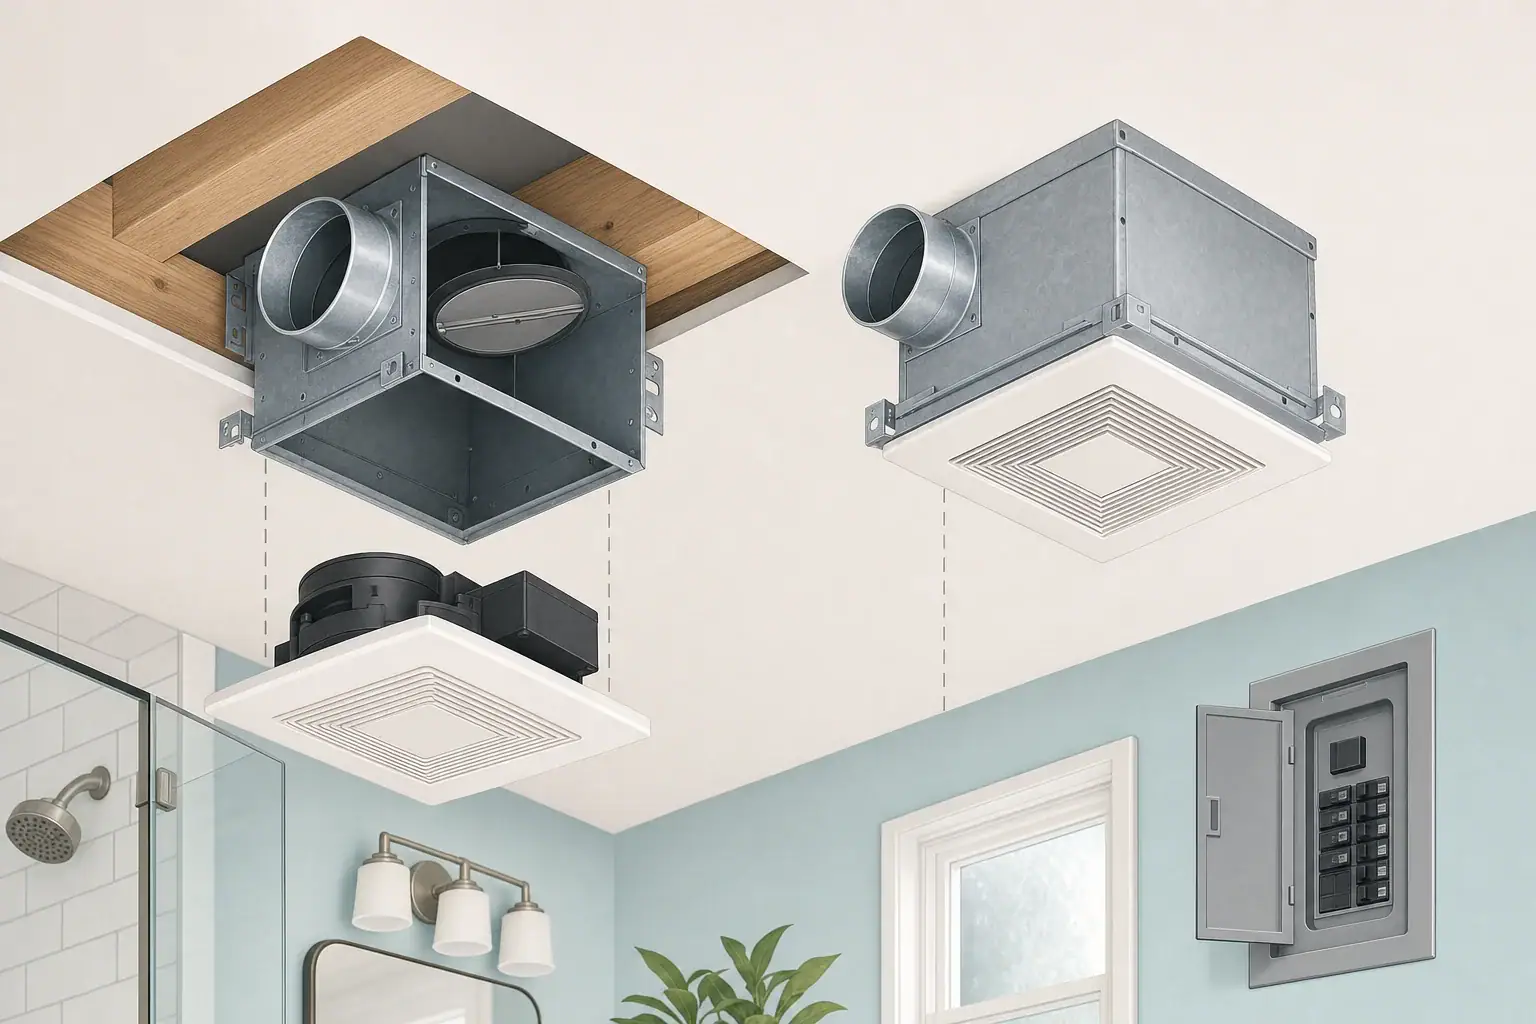
Quick answer: To replace a bathroom ventilation fan, turn off and secure the circuit, verify it is de-energized using an appropriate test method, then identify the existing housing. Use a motor-and-grille retrofit only when its manufacturer lists that housing as compatible. Otherwise, replace the complete housing while matching the opening, duct, mounting, and electrical arrangement.
Choose a retrofit kit or a complete housing replacement
The first decision is whether the existing metal housing can stay in place. A motor-and-grille retrofit normally retains the housing, duct connection, damper, and often an internal receptacle. It is appropriate only when the retrofit manufacturer explicitly lists the existing housing or fan model as compatible.
Do not select a replacement motor because its plug or dimensions merely look similar. The blower plate, mounting points, airflow path, electrical connection, and grille attachment must be designed for the retained housing.
| Existing condition | Motor-and-grille retrofit | Complete housing replacement |
|---|---|---|
| Exact housing or model is listed as compatible | Usually the simpler option | Possible, but may be unnecessary |
| Housing is loose, corroded, perforated, or distorted | Do not use | Replace the housing |
| Duct collar, damper, or internal electrical parts are damaged | Usually unsuitable | Replace the unit; seek professional help as needed |
| No compatible retrofit provides the desired rated airflow | Not suitable | Select a complete unit that fits the installation |
| New unit has a different duct diameter or collar location | Not applicable | May require HVAC work |
| Wiring, controls, or circuit functions must change | Not a simple retrofit | Use a qualified electrician |
| Duct does not discharge outdoors | Does not solve the problem | Have the duct route and termination evaluated |
For example, the instructions for one NuTone upgrade kit direct the installer to stop if the retained housing is insecure, corroded, perforated, or has a damaged receptacle. That instruction is specific to that kit and its listed compatible housings, but it illustrates why a sound housing is essential.
Measure before buying a replacement
Take photos and measurements before ordering. A grille size does not reliably identify the housing size behind the ceiling.
- Model and housing number: Photograph every readable label. Note whether the fan, light, heater, humidity control, or timer has separate controls.
- Ceiling opening: Measure the finished opening length and width.
- Housing depth: Check available space above the ceiling, including framing, pipes, wiring, and insulation.
- Framing position: Identify the joist or approved support location. Do not cut structural framing to make a housing fit.
- Duct diameter and approach: Record the duct size, material, shape, and direction at the fan collar.
- Electrical access: Note the location of the wiring compartment and whether it is accessible without disturbing concealed wiring.
- Airflow and sound ratings: Compare certified airflow in cubic feet per minute (CFM) and sound in sones.
- Grille clearance: Confirm the new grille covers the opening and clears nearby trim, lights, cabinets, and walls.
- Outdoor discharge path: Identify the exterior termination and any accessible fan or exterior damper.
The Home Ventilating Institute (HVI) explains that certified ventilation products report airflow in CFM and sound in sones. These ratings are obtained under standardized test conditions; restrictive ductwork, poor connections, and terminations can affect installed performance.
How to replace a bathroom ventilation fan
1. Shut down, secure, and verify the circuit
Turn off the applicable breaker at the service panel. Prevent someone else from restoring power while work is underway, and verify that the fan circuit is de-energized with an appropriate test instrument and method before touching the fan, receptacle, or wiring. If you cannot confidently identify or verify the circuit, stop and contact a qualified electrician.
A Broan-NuTone room-side fan manual instructs installers to switch power off at the service panel and lock the disconnect when possible, and it assigns installation and wiring to qualified people under applicable codes. Follow the manual for the exact replacement model; do not transfer its dimensions or wiring arrangement to a different fan.
2. Remove the grille and inspect the existing installation
Support the grille and release it using the existing fan’s instructions. Many grilles use spring clips, but attachment methods vary. Avoid pulling on any light wiring. Photograph the housing label, blower plate, receptacle, fasteners, collar, and damper before further disassembly.
Stop the retrofit path if the housing moves, is corroded or damaged, has holes, has damaged electrical parts, or has a defective duct connection. A new motor and grille cannot make a compromised housing safe or properly sealed.
3. Fit a documented compatible retrofit
When compatibility and housing condition are confirmed, follow the retrofit kit manual in its stated sequence. Depending on the kit, this may include unplugging the old blower from the housing receptacle, releasing its designated retaining hardware, placing the new blower plate into its specified slots, securing the prescribed fastener, and installing the matching grille.
Do not drill improvised mounting holes, alter a plug, splice conductors, or bend the housing to make an incompatible part fit. With power still off, confirm that the blower wheel turns freely and does not contact the housing.
4. Use a complete housing replacement when required
Full replacement requires access to the housing fasteners, duct connection, and electrical compartment. Some products are specifically designed for room-side replacement; others require access from above. Hidden fasteners, inaccessible ductwork, or concealed wiring can make an apparently simple project unsuitable for a homeowner.
Before removing or cutting anything, compare the new fan’s installation instructions with the existing opening, ceiling thickness, housing depth, joist position, duct collar, and wiring-compartment location. Enlarge a finished opening only when the product instructions allow it and only after confirming that framing, wiring, plumbing, and other concealed items are clear of the cutting path.
Mount the housing to framing or to the approved support system specified by the manufacturer. It should remain rigid when the blower starts and when the grille is handled. Do not rely on drywall alone unless the product instructions expressly provide an approved room-side mounting method for that ceiling construction.
New wiring, changed controls, fan-light-heater combinations, damaged conductors, missing grounding provisions, or uncertainty about the existing circuit are electrician triggers. They are not extensions of a like-for-like mechanical replacement.
Check the duct collar, damper, and discharge path
Before closing the ceiling, confirm that the duct collar aligns with the existing duct without crushing or sharply deforming it. The fan must move bathroom air into the duct. Its backdraft damper must be able to open in that direction without interference from a screw, tape, insulation, or the duct wall.
Use connection and sealing methods permitted by the fan and duct manufacturers. A mismatched adapter, undersized duct, abrupt transition, or damaged flexible duct can reduce delivered airflow and increase noise. A higher-rated fan does not by itself correct a restrictive duct system.
The duct should discharge outdoors, not into an attic or another enclosed space. The ENERGY STAR HVAC Quality Installation Guidebook describes direct outdoor exhaust and sealed duct connections, while noting that ducts and terminations can reduce installed airflow below a fan’s factory rating. Treat this as general installation guidance, not a substitute for the current local code or the selected fan’s manual.
If the duct is inaccessible, disconnected, damaged, or requires rerouting, a new wall opening, or roof work, use an HVAC contractor or an appropriate exterior professional. Do not climb onto a roof merely to finish an interior fan replacement.
Restore power and check operation
- Confirm clearance: Ensure the blower wheel, wiring, damper, and grille springs can move without interference.
- Close the electrical compartment: Install every required cover and fastener before restoring power.
- Seat the grille: It should sit evenly against the ceiling without distorting the housing or blocking the intake.
- Restore power: Test each existing switch function separately. Turn the unit off and seek help if the breaker trips, the motor does not start normally, or there is an electrical odor.
- Observe air direction: Air should enter the grille while the fan runs. A tissue held near the grille can indicate direction, but it does not measure airflow.
- Observe accessible discharge components safely: If the exterior termination is visible from the ground, check that its damper responds. Do not use roof access for this check.
- Listen for abnormal noise: Rubbing can indicate blower interference; rattling can indicate loose mounting or grille hardware. Shut off power before inspecting any internal part.
If delivered airflow matters or remains uncertain, an HVAC contractor can measure it rather than inferring performance from noise or a tissue test. For troubleshooting after installation, see Bathroom Exhaust Fan Not Pulling Air: Tissue Test and Checks.
When to call a professional or local authority
- Call an electrician for damaged wiring or receptacles, uncertain circuit identification, new wiring, changed controls, added fan functions, or uncertainty about the existing electrical arrangement.
- Call an HVAC contractor for inaccessible or damaged ducts, duct-size changes, major restrictions, uncertain outdoor discharge, concealed rerouting, or inadequate airflow after replacement.
- Use an appropriate roofing or exterior professional when a wall or roof termination must be created, moved, or repaired.
- Check with the local building or electrical authority before work that changes wiring, duct routing, structural framing, or an exterior opening. Permit and inspection requirements depend on the jurisdiction and project scope.
Replacement summary
Keep the existing housing only when it is secure, intact, properly ducted, and explicitly listed as compatible with the retrofit. Otherwise, select a complete fan whose housing, opening, framing, duct collar, electrical access, airflow rating, sound rating, and grille fit the installation. Leave circuit changes, concealed duct alterations, structural work, and exterior penetrations to qualified professionals.
Related guides: Exhaust Fan Best Practices: Bathrooms and Kitchens That Actually Clear Air • Bathroom Mold Prevention: Exhaust Fan Timing and Humidity Control • Bathroom Fan Timer Settings to Prevent Mold After Showers
Recommended next:
- Ventilation vs Air Purifier: When You Need One, the Other, or Both
- CO2 in Bedrooms: What Levels Mean and How to Improve Air Exchange
- How to Ventilate in Winter Without Freezing: Practical Strategies
- Exhaust Fan Best Practices: Bathrooms and Kitchens That Actually Clear Air
- Air Exchange Basics: ACH, Infiltration, and Why “Stuffy” Happens
- ERV vs HRV: What They Do for Indoor Air Quality
- Clear sizing logic (room size → CADR/ACH)
- HEPA vs carbon explained for real use-cases
- Humidity + ventilation basics to reduce mold risk